Adding Text and Buttons
In the second part of this tutorial we are going to start getting to grips with JAVA OOP by adding interactive functionality to our app. Including allowing the user to enter the amount of noodles they want and display the price. The logic we build here means it will become even easier to add more functionality going forward.
In this section we are going to start adding text, buttons and other features as well as using JAVA to manipulate the text that we display. Additionally we will be upping the level of code engagement. This time I will be uploading snapshots of my code instead of directly pasting the source for you to copy, the reason for this is it is important for you to develop the muscle memory and not get used to copying and pasting. In this chapter what we want is to see a layout like the following.

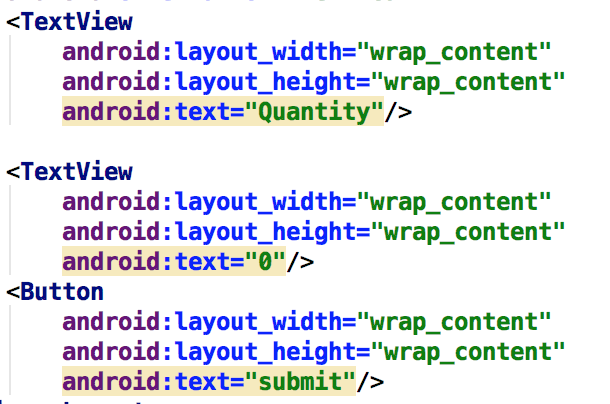
Lets start by building the text and the buttons, go back to the activity_main.xml file within the layout folder. Under your image view you want to add a line of text called quantity, then under that we want to display the number (which we will allow the user to update in the future) and finally a button underneath for the customer to submit the order. The code for these text and button views are as follows:
It is important to make sure that this code is nested within a linear layout (this is because we want each field to flow sequentially downwards and not to the right/left or anywhere else. This means adding orientation to the linear layout also, as per the following snippet.
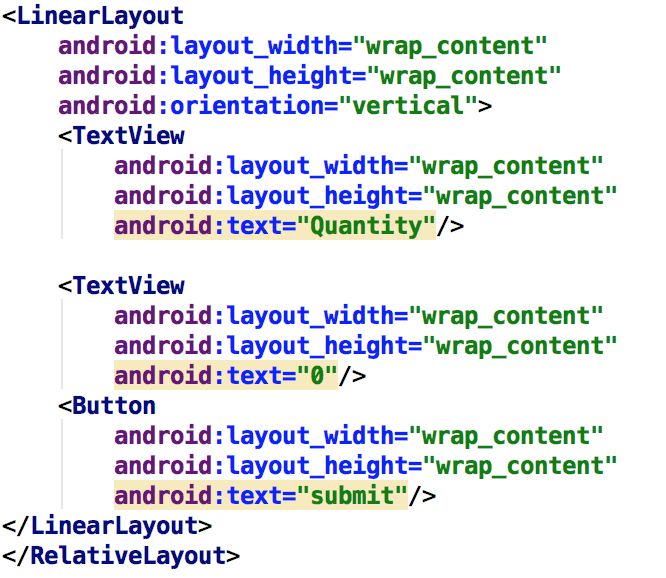
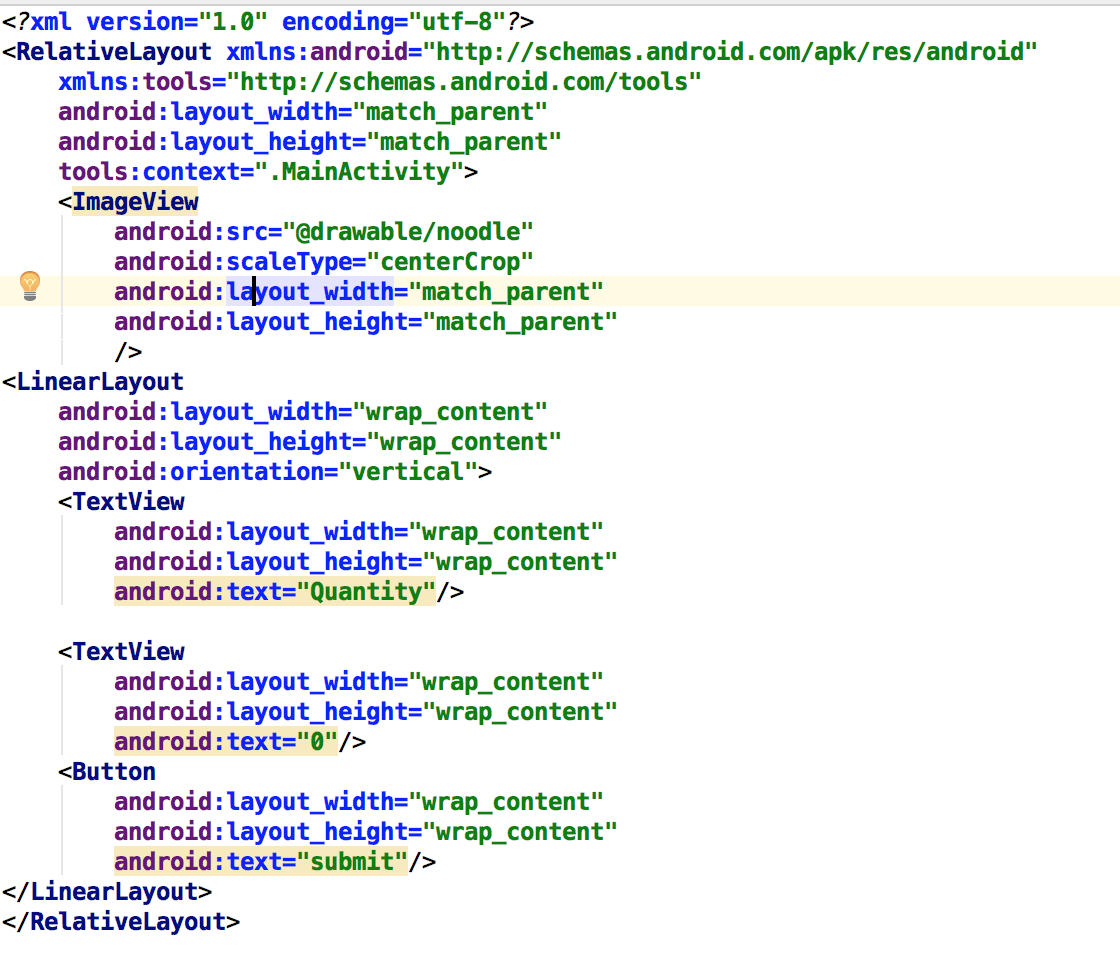
You need to experiment with linear layouts, relative layouts and nesting them to see what works. Also don’t forget to add in your orientation (such as vertical or horizontal like this android:orientation=“vertical” in your layout tags. The final code snippets should look something similar to below:
tyding up
In order for us to interact with the app, we want the quantity value to change when we increase the order amount (with buttons we will add later). So first go ahead and add and ID to your 0 textview. We will also add a dark color to differentiate it too, and add 16sp of space to both sides.
android:id=“@+id/quantity_text_view"

android:textColor=“#000000"

android:textSize="16sp"
There will be other styles you may want to add to your app as you move forward but that is something I think you can pick up as you go. Things like adding margins above the submit button but below the quantity text field. As we are going to add + and - buttons to the left/right of the zero. To help you get to grips with all the styles have a look at the cheatsheet here.
JAVA Manipulation
Now we are going to change the value of 0 to 1, once we click submit. To do that we need to create an on click function for the submit button, we already have an id the 0 number (quantity_text_view). The idea being that our java can reference these fields via the ID and the onlcick tag. In your button add
android:onClick=“submitOrder"
Now go ahead and add the following JAVA code to your main activity
     /**
     * This method is linked ot the activity main submit text, via the onlcick method
     */
      public void submitOrder(View view) {
        display(1);}

    /**
     * This is a simple method that makes the input number the textview
     */
      private void display(int number) {
        TextView quantityTextView = (TextView) findViewById(R.id.quantity_text_view);
        quantityTextView.setText("" + number);}
So far this activity contains three methods, the method display, uses a constructor function that allows us to modify a text view, the findviewbyid allows us to pull the specific text view we want to modify (as long as the xml text has an ID field, in this case its the one we defined as quantity_text_view). Load up the app and press the submit button, you should see it increment to 1.

Challenge - now try to update the app to have it display 2 when the submit button is pushed. Source code is javastep one in my github repository.
Adding More Fields
Now add some padding to all the text/buttons to move it out form the left side about 10dp, hint there is an easier way than applying a margin to each view individually.
Also go ahead and add text price and a value for the price, simply repeat the two quantity views. Don't forget to assign an id price_text_view so we can modify it. It should look like so.

Now lets add some code so that the quantity is 2 and when we press submit it displays a price for the two coffees. Firstly lets generalise our input to the display by passing a variable that is already set.
public void submitOrder(View view) {
        int noodleAmount = 2;
        display(noodleAmount);
    }
Then we want to create a displayPrice() method that will construct a text view pulling in our price_text_view for modification.
private void displayPrice(int number) {
        TextView priceTextView = (TextView) findViewById(R.id.price_text_view);
        priceTextView.setText("£" + number);
    }
The pound sign just prefixes the price, We can now go ahead and add some price manipulation code to our original submit order
public void submitOrder(View view) {
        int noodleAmount = 2;
        display(noodleAmount);
        displayPrice(noodleAmount * 3);
    }
Now when we press the submit order button we should see the following .

If you don’t have a pound sign in your price text view, then the pound sign will appear to come from nowhere, but its entirely up to you. As we progress I will leave out less steps of design and low level code detail but I will have frequent checkpoint links to my source code that you can refer to so you don’t get lost. Here is where we should be by now.
Hooking up more buttons
Now we we want to add a plus and minus button above and below the number 2 in quantity, then we want to hook up java to it so it actually changes the number displayed. Then we will tie it all into the submit buttons. Lets change the initial value to be 1 and the price to be £3.
To add the buttons, you might want to start with copying the submit button above and below. Also I am entering the text views (just for now to make it easier to see). The layout code should look something like this
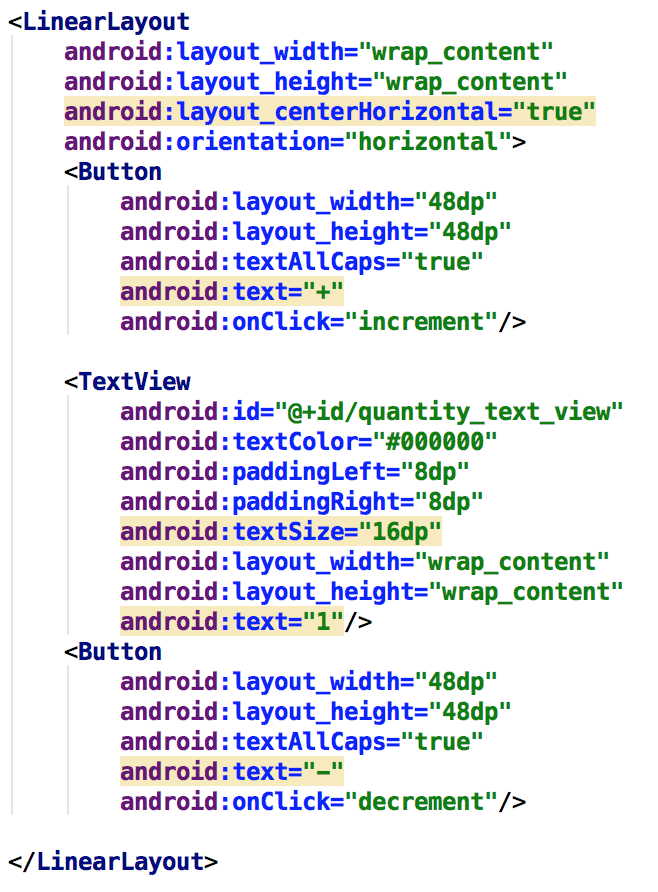
Now we want the java to call a method called increment when the plus is selected and decrement when the - is selected. These both work in a similar way as the submit button before in that the these methods will be linked to the increment/decrement xml views using the onClick function. Bring the noodleAmount variable outside of the onClick methods this keeps it a global variable. For future you may want to find a way to prevent the conflict of Quantity in your text view and Noodle amount linked as your JAVA, this is a challenge step for honing coding fundamentals. Also we will put a limit on the number going under 1 and over 10. To give you a head start, I have included an example of the increment java code you want to include below. The name increment can't change as this is what we declared in the onClick field in our XML view, what is happening under the covers is the variable increment is assigned when we declare onClick and is ready to be used in our MainActivity java class.
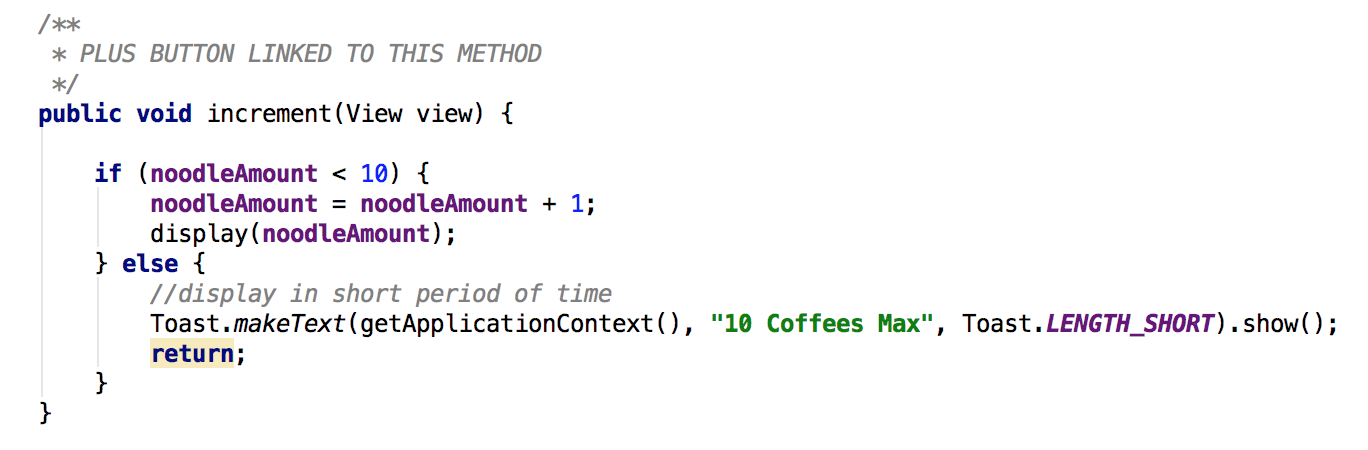
The increment method evaluates the variable noodleAmount, and if its less than 10 it will add 1 to the value and display the amount. Otherwise it displays a message (using the TOAST function) to tell the user only 10 coffees are allowed as a maximum. Hopefully you should have been able to replicate this, next up is for you to try and code the decrement utility yourself.
Stop the bus! when you press the increment button you should notice the noodle amount increase, but sometimes when you press submit the number changes. There is a bug in the code, see if you can find it before reading the solution coming right up……
Did you spot the bug? What we have done wrong is that we display the noodle amount in our increment/decrement and our submit order view. In our submit order we don’t need to modify the noodle amount, since that is already taken care of by increment and decrement functions. Also notice that in the submitOrder we are also resetting the noodle amount to 2, we need to get rid of this too. So delete the following code from SubmitOrder.
int noodleAmount = 2;

display(noodleAmount);
Now its time to re-run your app and once you are done or if you are lost then the source code should look like this .
PART 2 COMPLETE
Fantastic work on getting this far, now we have achieved the ability to allow the user to run our app on their phone/simulated device, they can enter the amount of noodles they want then submit to find the cost. I know this seemed like quite al to for a small amount of functionality, but you can rest assured more complex functionality doesn’t take that much more, additionally we have the main foundations in place.
In the next and final lesson we are going to allow the user to input their name, pick more noodle options and when they submit they will get the order repeated back to them, and it will connect to the ‘shop’ and pass on the customers order ready to be picked up.