Overview
In this tutorial we want to build a backend service, that can be called from a browser or a front end and pass back data to the user. The data it passes back will be stored on our database that we will build, for example this could be a list of customers. This is a bit of an advanced tutorial where we will implement four key concepts via the first hand approach. I will do my best to keep things as straight forward as I can, we are going to cover PHP, REST messaging, JSON data interchange and managing a mySQL database.

The process of communicating with our API is using REST which essentially has four main states (which is defined by the URL affix) you will see more about this later. In our API, we will make use of all REST states POST, PUT, GET and Delete which will also be linked to our database operations of Add, Update, Retrieve and Delete records respectively.
If at anytime you get stuck, please reference the my support code that can be found here. Also there are earlier versions of my code labelled restfulldemopt1 and pt2. Ok, lets get started!
Installing the required Software
Composer
You can get Composer here however the main issue here is actually getting composer to work (if you use mac). After running the suggested terminal script like below, you should try to input the command composer to see if it actually works.
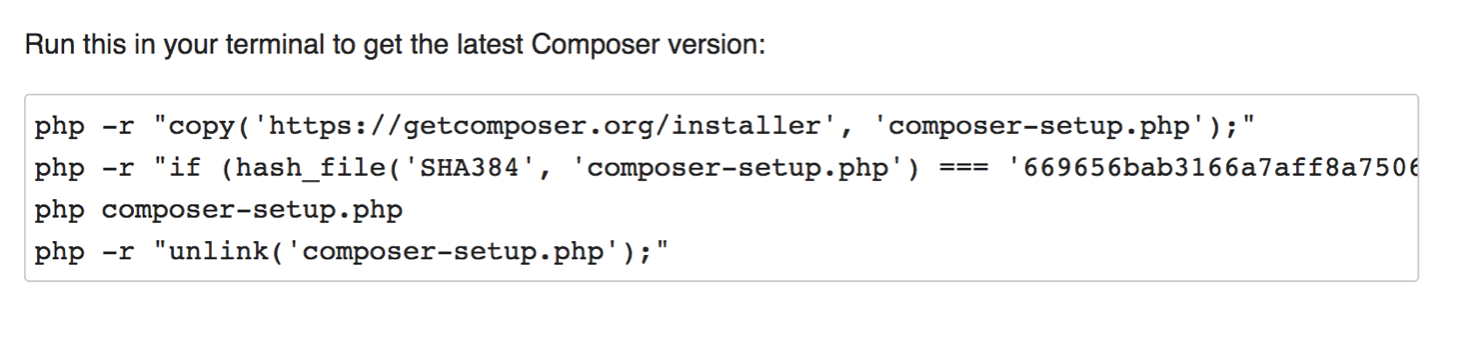
If the response is bash command not found, then find the composer.phar file and try to run the following command.
$ mv composer.phar /usr/local/bin/composerNow you need to install a platform that will allow you to set up a server on your own computer (Apache), to work with PHP and use PEARL. This can be done by installing either WAMP, MAMP or XAMP these are specifically for Windows, Mac and Linux respectively. Although XAMP now runs on all three operating systems. The link can be found here
The next step is to download an extension that allows you to initiate RESTful requests, this is a great way for debugging your API once set up. You can constantly fire in requests to add, delete, read and update data from your DATABASE provided by your API, this can be customer information, stock quantity etc. To do this its best to download RESTeasy extension on chrome. Simply click the apps icon in your chrome nav bar, go to the web store and enter RESTeasy in the search.It is offered by resteasy.venuedistrict.com and is a ‘developers tool’.
File Creation
To get started go ahead and create a file in your htdocs folder of your XAMP/WAMP/MAMP directory. You can do this via normal finder/window method, but to get practice with terminal do the following.
cd /applications/xampp/htdocsNow lets create our new folder
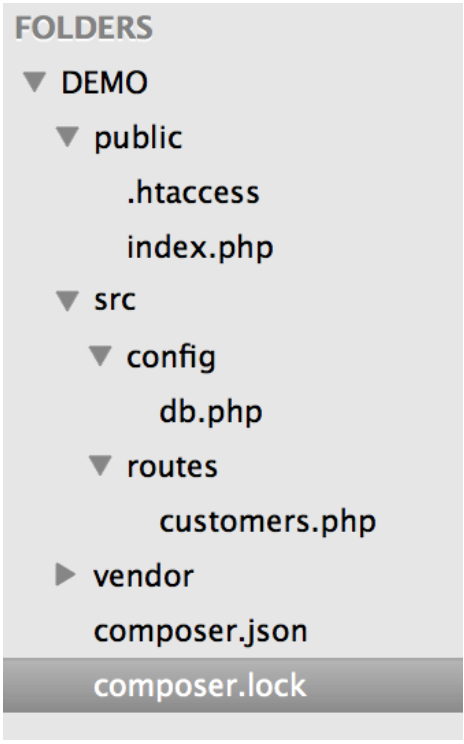
mkdir demoFirst set up a folder structure like the below, don’t worry about the ‘vendor’ file, this gets created in a later step when you install slimphp from command line. DEMO is the main folder directory, public is where the user comes into, and there is a .htaccess file which we will insert some code to help shorten our URL. SRC directory, has a config folder where we contain our database settings, routes is where we contain our actual script for processing customers.
Install SLIMPHP and Create Our Home Script
Next in order to add our vendor files (including the libs that lets us handle JSON) we should download a PHP tool, slimPHP, the easiest way to do this is to run the suggested command from the SlimPHP site for mac and the current script its
composer require slim/slim "^3.0"Now its time to start creating some files, I am using sublime to do my coding and file creation but you can use brackets notepad ++ or many others. In the DEMO folder, create an index.php this is where the main php scripts are going to be written and paste in the example from slimphp website in getting started.
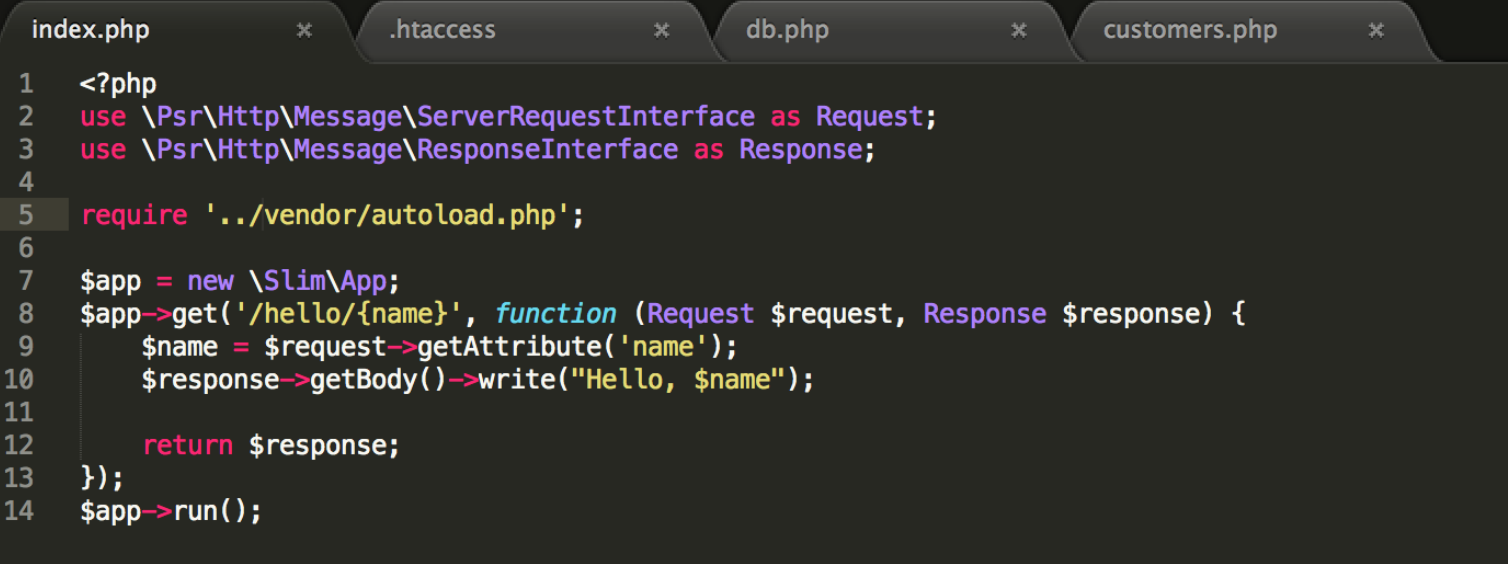
When we create a restful API we create routes that deal with requests and response objects, that is what we are doing in the first two lines, we are dealing with the request/response objects. So every SLIM application/route is given these object as the argument for the call back routine. SLIM supports PSR7 the php standard for messaging, a great approach for writing apps. Autoload.php is created by composer and allows us to refer to SLIM dependencies. $app-> allows us to create our route. in this case its /hello/name
We then compose the response and return it. Finally we need to do the run command at the end to make it actually work. In our case we modify the require statement to add ../ as we are in the sub directory.
Starting and Stopping Your Server
In order to run our php pages on a server, and navigate to them via the browser we need to start our servers. Locate the XAMPP application and click start all servers. This can be a tricky step as sometimes the severs don’t start due to other applications using port 80, alternatively you can run
sudo lsof -i -P | grep -i "listen" this should output open ports any problems just drop me a message. Once you are ready go ahead and open up a browser and put in
http://localhost/slimapp/public/index.php/hello/bobBob can in fact be any name due to the way the code is set up, have a look at your index script to make sure you understand what is happening .
ACCESS TO OMIT INDEX.PHP PATH
We don't want to include the index.php every time so we will use a ht access file, additionally to omit the xxpubicxx part of the URL, we can add a virtual host in Apache.
RewriteEngine on
RewriteCond %{REQUEST_FILENAME} !-d
RewriteCond %{REQUEST_FILENAME} !-f
RewriteRule . index.php [L]
Adding virtual host - Enable Virtual hosts
I am actually having trouble with making this work myself, but if you want to try then first thing you’ll need to do is open the file /Applications/XAMPP/xamppfiles/etc/httpd.conf in your favourite text editor. Look for the following lines:
# Virtual hosts
#Include /Applications/XAMPP/etc/extra/httpd-vhosts.conf
conf >> extra>>httpd-vhosts.conf or /Applications/XAMPP/xamppfiles/etc/httpd.conf on the mac. Note make sure this isn't the folder with the tag original, that is just a backup in case the httpd file is corrupted or mistakes are made. Follow the steps in the help link provided in the httpd.conf doc, and once you are happy you have set up your virtual host, you need to go to the hosts document and add the host database. Either way be very careful in this process as its easy to cause problems to your server.
Point to a Working Directory
Now we are going to modify our main index.php file so it points to our customer script, this is where we will perform our main part of our work. Note once you do this, your original URL you used for returning hello/name will no longer work Follow the step below
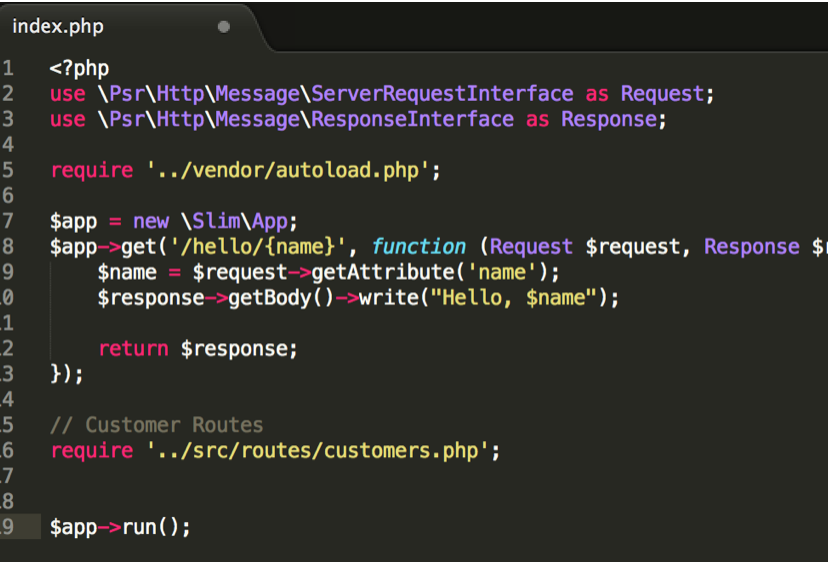
In our customers php file, lets add the following and run the code by navigating to it in the browser as shown in the example below
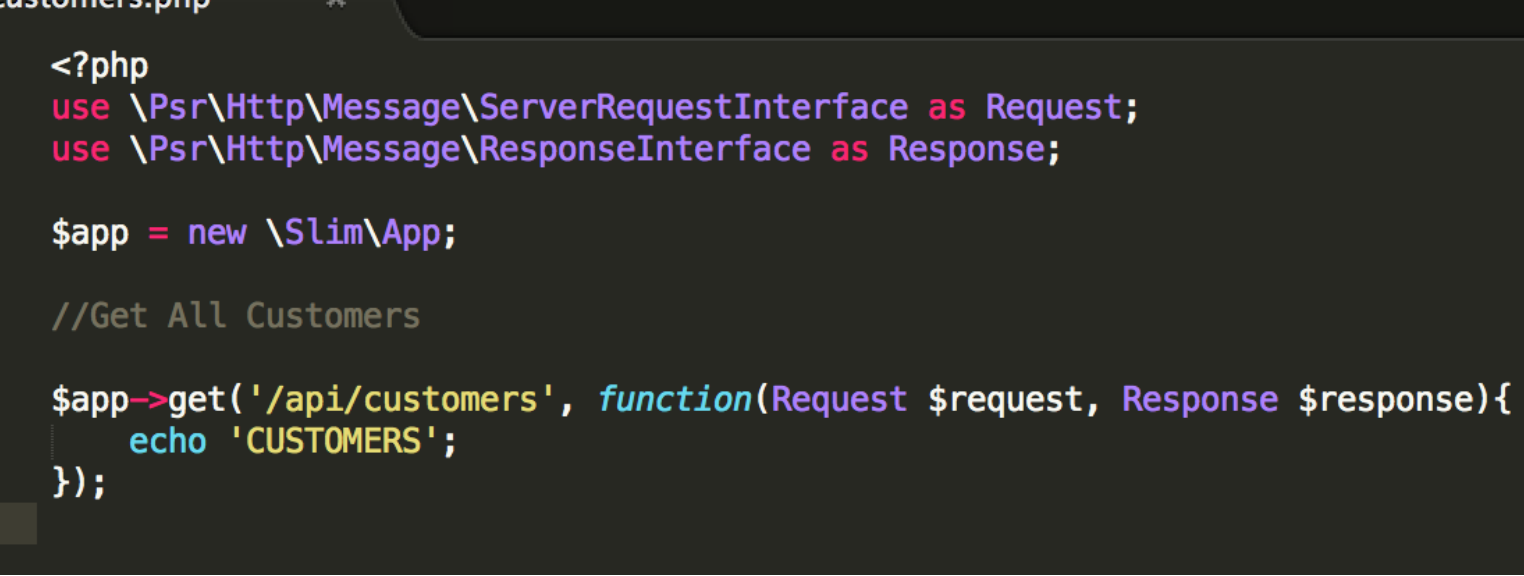
http://localhost/demo/public/api/customers once loaded into the browser you should see the text CUSTOMERS printed to the screen
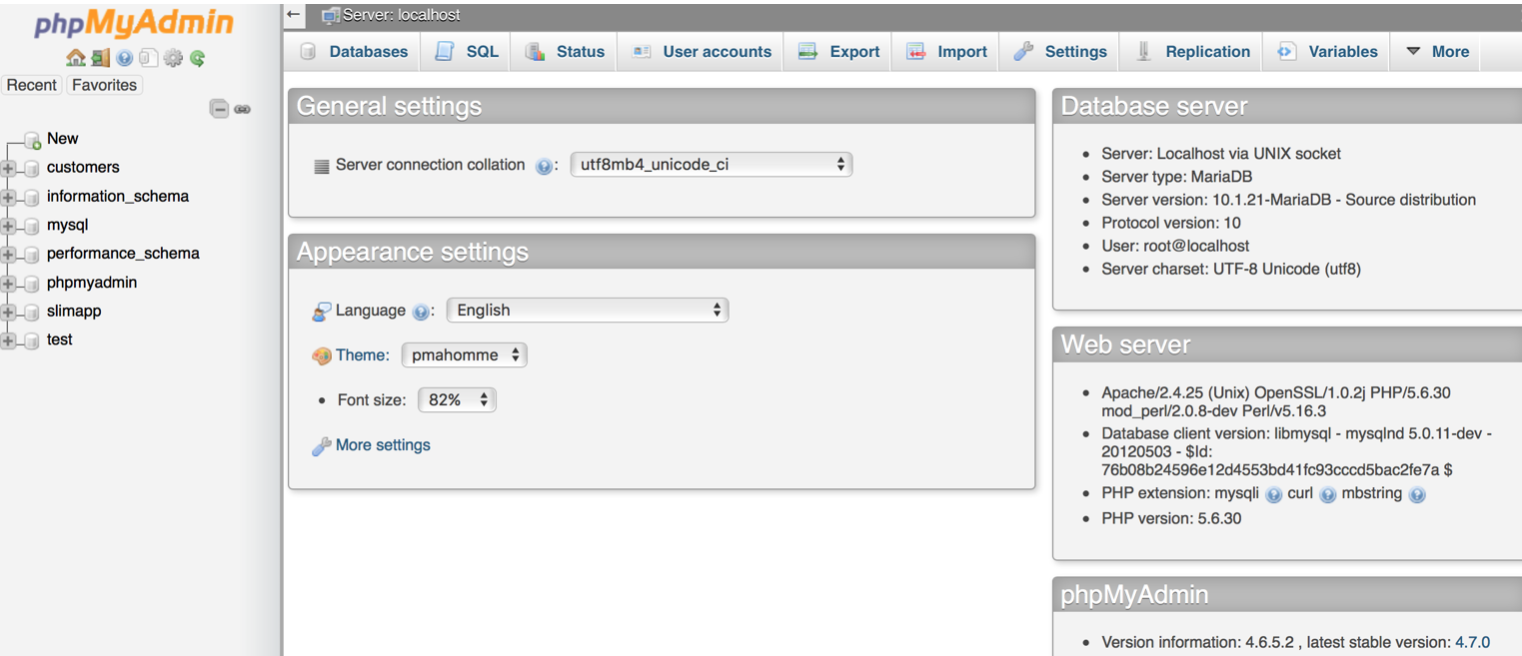
Create a Database
The whole point of building this API is so we can store information on a database and allow customers/ front end users to interact with it via the service API we provide. Lets create a bare bones database. First log into http://localhost/phpmyadmin you should see a screen like the following
first_name
last_name
phone
email
address
city
district
Connect to a Database
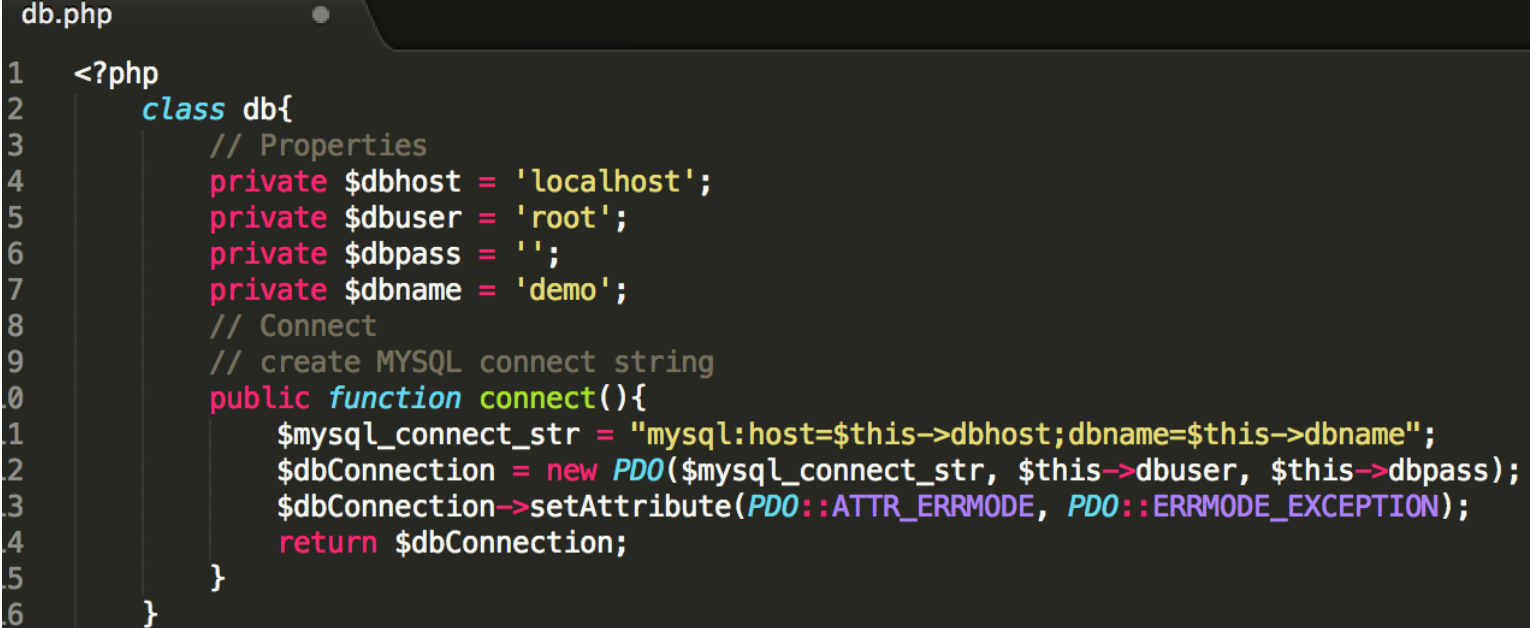
DEMO has no native data database wrappers so we will use PHP, specifically PDO which are PHP data objects (info can be found here) . This is an alternative to mySQLI, here you can find the connection documentation which you may need to reference when learning about setting up connections to your database, for now we can use my example. Now its time to set up your database configuration, its worth reading up on how this all works, but I have included my code sample for a starter, note that you will need to configure user/passwork/database name accordingly. If you are doing something different from my steps, then this can be quite an in-depth process so please contact me if you have any issues.
Test Connection String
Add a reference to the database in the main index.php script below the autoload require clause like so
require '../vendor/autoload.php';
require '../src/config/db.php';
http://localhost/demo/public/api/customers if you see any errors, then there is an issue with connecting to the database and you may need to trouble shoot your user/password/host settings.
Using PHP and PDO
Before we go to creating statements, here are some tips on using PHP with PDO standards, remember there is also links to the documentation provided in the ‘connect to a database’ section above. To create a variable, we use the $ sign, applying a function like connect looks like this.
$db->connect();
$stmt = $db->query($sql);
$customers = $stmt->fetchAll(PDO: :FETCH_OBJ);
In general...
	// when we are working with PDO we need to create statements
	// there are a few benefits to creating prepared statements
	// 1. the query only needs to be parsed once
	// 2. can be executed multiple times with the same / or diff peramaters
	// 3. the parameters don't need to be quoted.
Retrieve customer information as JSON
Now its time to writes some code that will pull customer information from our database . Instead of doing an echo of CUSTOMERS text, we want to add an SQL variable that selects all from our database. This will be executed in a try/catch step, the modified code looks as follows.
//Get All Customers

$app->get('/api/customers', function(Request $request, Response $response){
	$sql = "SELECT * FROM customers";

		try{
			// Get DB object
			$db = new db();
			// connect
			$db = $db->connect();
			// when we are working with PDO we need to  create statements
			// there are a few benefits to creating prepared statements
			// 1. the query only needs to be parsed once
			// 2. can be executed multiple times with the same / or diff peramaters
			// 3. the parameters don't need to be quoted.
			//stmt is standard
			// passes in $sql var


			$stmt = $db->query($sql);
			$customers = $stmt->fetchAll(PDO::FETCH_OBJ);
			$db = null;
			echo json_encode($customers);


		} catch(PDOException $e){
			//e for errors exception handling
       		 echo '{"error": {"text": '.$e->getMessage().'}';
    	}
});
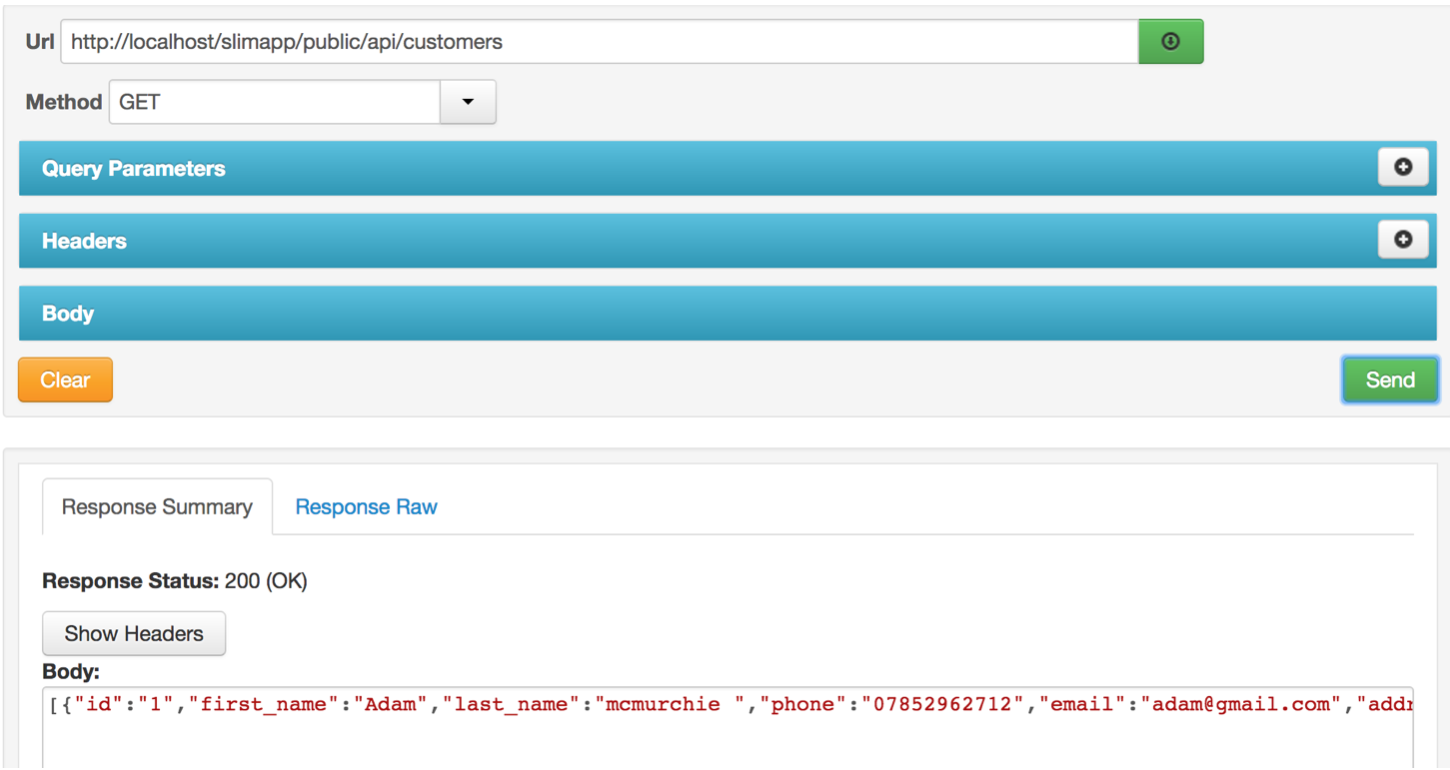
I understand there is a lot of new things we added, including the SQL so please look through the code to familiarize yourself, if you are struggling to understand then start by reading up on basic sql, then php DB connection examples. Call the same URL http://localhost/demo/public/api/customers and you should now see the record outputted into the screen .
Interrogate API with RestEasy
It is time to treat our code like a professional API backend and interrogate it the proper way, with a front end mockup. Open RESTeasy application and follow the steps shown in the screen shot below.
If it works you will see 200 which means that everything is OK! Well done! This is a big step, you have effectively managed the core functionality of your API, now we simply add more features to the process, such as the full CRUD service of create, read, update and delete.
Retrieve a Single Customer from Database
So far so good! Again there is a lot of code that would take another tutorial to explain, so for this purpose it will be to get us up and running, I advise revisting the code for a deeper study afterwards. Copy the get all customers code and paste below, first change the route to point to the id as follows
//Get A SINGLE CUSTOMER
//****All customers terms changed to customer, except in SQL statement
$app->get('/api/customer/{id}', function(Request $request, Response $response){
	$id = $request->getAttribute('id');

	$sql = "SELECT * FROM customers WHERE id = $id"; //$id comes from the URL

		try{
			// Get DB object
			$db = new db();
			// connect
			$db = $db->connect();


			$stmt = $db->query($sql);
			$customer = $stmt->fetchAll(PDO::FETCH_OBJ); // changed to singular
			$db = null;
			echo json_encode($customer);  // changed to singular


		} catch(PDOException $e){
			//e for errors exception handling
       		 echo '{"error": {"text": '.$e->getMessage().'}';
    	}
});
These steps simply allow the database to fish out one record which matches the user input. Now lets use the Resteasy front end to call our API, note we need to change the url, as we amended in the code. This time its not customers in the URL, it is customer, followed by a number (which related to the ID) as shown below. 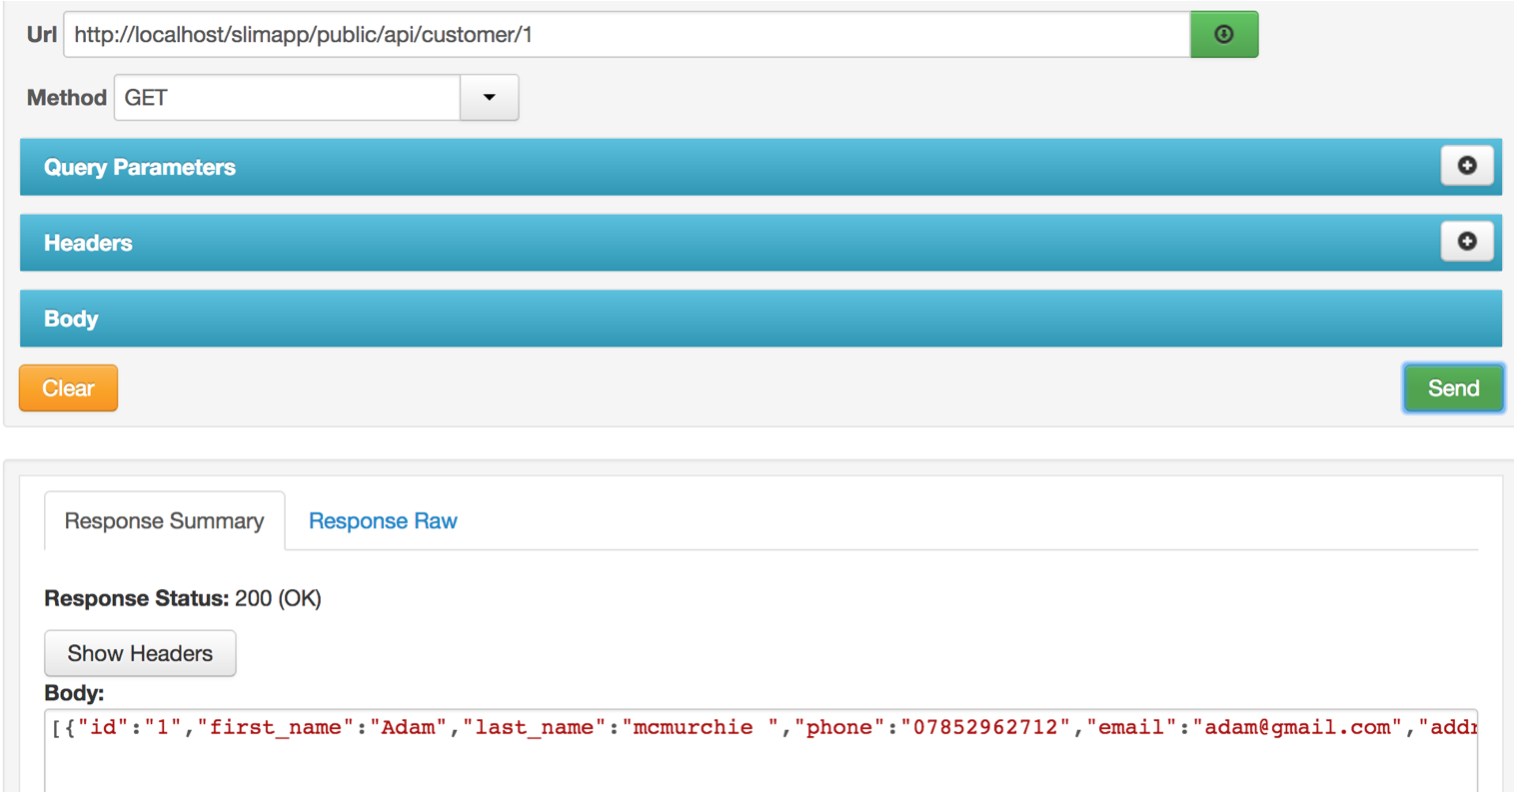
Note if we change id to 2, we can pull back the second customer from the database, more specifically, the customer whose ID relates to number 2.
Add a Customer
Now we want to add a customer, here is the add customer code to adde below in your customers.php file.
// Add Customer
//we need to get the parameters, usually these would be thru a form, instead of get attribute which is the url
	// if now we want to get param
$app->post('/api/customer/add', function(Request $request, Response $response){
    $first_name = $request->getParam('first_name');// GETS PARAMETERS FROM USER INPUT
    $last_name = $request->getParam('last_name');
    $phone = $request->getParam('phone');
    $email = $request->getParam('email');
    $address = $request->getParam('address');
    $city = $request->getParam('city');
    $district = $request->getParam('district');
    $sql = "INSERT INTO customers (first_name,last_name,phone,email,address,city,district) VALUES
    (:first_name,:last_name,:phone,:email,:address,:city,:district)";
    try{
        // Get DB Object
        $db = new db();
        // Connect
        $db = $db->connect();
        $stmt = $db->prepare($sql);
        $stmt->bindParam(':first_name', $first_name);  // BIND EACH PARAMATER
        $stmt->bindParam(':last_name',  $last_name);
        $stmt->bindParam(':phone',      $phone);
        $stmt->bindParam(':email',      $email);
        $stmt->bindParam(':address',    $address);
        $stmt->bindParam(':city',       $city);
        $stmt->bindParam(':district',      $district);
        $stmt->execute();
        echo '{"notice": {"text": "Customer Added"}';
    } catch(PDOException $e){
        echo '{"error": {"text": '.$e->getMessage().'}';
    }
});
Now we want to actually execute this with our front end using the GET request instead of the post request. Do the following add to the headers, content-type and call the value application/json.
here is some example code to try to add into the database.
{
	"first_name" : "Stacey",
	"last_name" : "Hoffman",
	"phone" : "444-333-111-34",
	"email" : "stacy@gmail.com",
	"address" : "27 London St",
	"city" : "London",
	"district" : "center"

}
Remember to change the URL and set the method to post (since we are using the REST update functionality). An example is shown below. 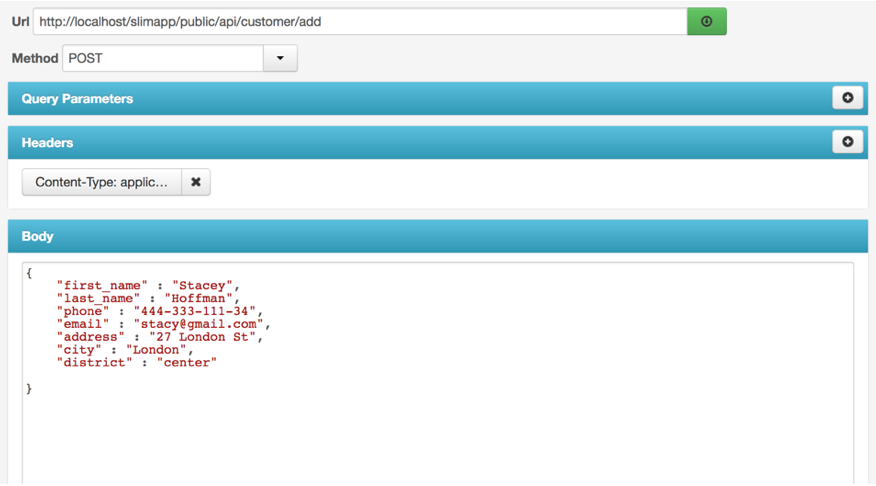
If performed correctly, you should see a response message saying customer added in the JSON response. You can reload the database to check, and it should look like something below.

CHALLENGE Try to pull back the newly added customer using the get a single customer method.
Finishing the project
Now all that is left to complete the CRUD operation of being able to update and delete a customer. Try to do this one on your own, however if you have managed to get this far please contact me for the full source code if you are struggling - as it contains the update and delete steps. A huge congratulations for attempting this tutorial, if you were able to get to the stage where you can interrogate your API by either the URL or rest easy then you have in a sense built a back end, you have also built and managed a database. Many thanks for all your efforts and I will be adding more content as well as a more in depth tutorial on these concepts.
Adam McMurchie 1/May/2017